
How To Do A Droplet Manicure
How To Do A Droplet Manicure
As a nail designers, have you ever gotten stuck with finding the perfect nail tip designs for your customers? Here is the recommendation for you: Droplet Manicure with Nail Tips. Now, you can earn more tips easily!

Nail tips with water droplets By: Jenna Donovan
Step 1: Apply a base coat to the nail tips.

Apply a base coat to nail tips.
Paint a base coat on the nail tips.

Paint a base coat on the nail tips.
You can choose clear nail tips when you paint the base coat. You can easily do a droplet manicure with clear nail tips. Droplet Manicure.
After choosing suitable nail tips for your fingers, you need to apply a top coat of polish. You can ask your customers which type of polish and color they like. If your customers do not know which color they want, green nail tips are a good choice.
You can choose dark green tip nails. The water droplet will show up well. One more option for you is dark red hues. The color will create a dramatic look and be ready on short notice. After that, wait ten or fifteen minutes for the nail polish to dry.
Manicure Nail Tips with Droplets

Nail tip design. Source: FUN Lacquer
There are two options that you can choose from:
One is that you can paint the water droplets on top of a solid base coat. Another one is that you can create nail tip designs by yourself or based on your client's needs.
Apply a clear matte polish on the nail tips!
The fact is that a technician cannot ignore a clear matte polish. Nail tip designs will have a flat effect with clear matte polish. Even with long nail tips or short nail tips, your customers' nails will show up better with a flat effect. You should apply only one or two layers.
We need to wait ten or fifteen minutes for the water droplets to dry. The nail polish needs time to dry, and then you can move on to creating water droplets.
Step 2: Make water droplets on nail tips

Apply clear nail polish. Source: LC nail
After their nails dry, you can continue creating the water droplets. Clear nail polish is an important technique. While any clear polish will suffice, the best option is a glossy quick-dry top coat that will make their nails appear moist and lustrous.
Moreover, using short coffin nail tips or almond nail tips will make customers' nails seem nicer.
To make droplets on nail tips, select dotting tools.

Dotting Tool.
You don't need any extra equipment to make the water droplets.
Dotting tools, which may be purchased online or at a beauty supply store, are used in nail salons.
Nail Dotting Tools are used to produce little dots on nails or nail tips using nail paint.
Both sides of nail dotting tools include spherical metal heads that may be dipped in nail paint and used to produce dots on nail tips.
A dotting tool can also be made from common household items such as a pin, toothpick, or bobby pin. Using the applicator brush that came with your clear nail paint is the simplest technique.
Begin to assemble the droplets on the nail tips.

Glue the drops on the nail tips. Source: lovandy
Dip the applicator into the fake nail tips to begin. Make sure there isn't too much nail paint on it. If this is the case, the fake nail tips may spread rather than make little dots.
Hold the brush at a 45-degree angle. To make dots, tap the corner of your brush in different places on the customers' nails. If feasible, vary the size of the dots. Make dots on each nail tips until customers are happy with the quantity of dots.
If you don't fill nails with dots and leave space between them, this style will look better.
If the dots are particularly thick, they may require additional drying time.
The procedure should be repeated.
On the initial levels, the dots may seem flat. On top of the initial series of droplets, construct another set of drops. Allow a minute for the initial layer of dots to dry before proceeding. Continue to layer until you have three-dimensional water droplets. The droplets should then be allowed to dry. Short coffin nail tips may dry faster than long coffin nail tips.
Step 3: Finish the nail tip designs
Allow time for the nail tip designs to dry.

Nail tip designs with Water Droplet. Source: Buzzfeed
Make sure customers' nail tips designs have plenty of time to dry. If this isn't feasible, remind your customers not to use their hands for the next several hours after you've painted.
They need to make sure that their nails don't get caught on anything. Water droplets may readily be shattered.
Here are some suggestions you can use when creating nail tip designs:

Pink pastel nail tip design with water droplet. Source: Iva
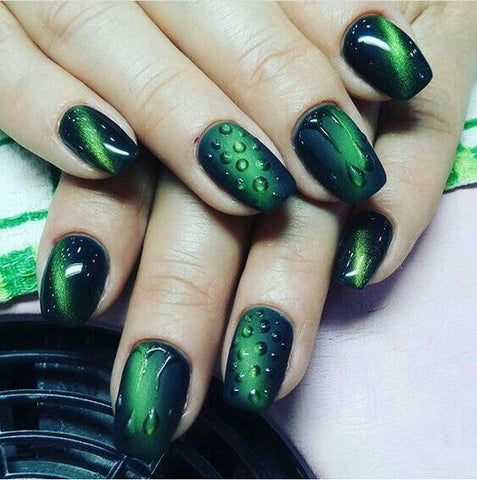
Dark green nail tips with water droplets Source: Pinterest

Beetle nail tip design. Source: Pinterest